Yoga For Snowboarding: 6 Poses To Prep You For Winter Riding

It’s almost that time of year. Tiny hints of autumn are already in the air. With cooler weather on its way, so is the (hopeful) promise of a strong snow season. I say this with great enthusiasm; I’m a snowboarder. I’ve seen firsthand how the growing popularity of snowboarding has brought more enthusiasts to the slopes each year.
Winter sports are my favorite, and nothing complements my yoga practice more than strapping into bindings and cutting through moguls like butter. A moving meditation in and of itself, snowboarding is a great activity for building patience and resilience. It goes hand-in-hand with yoga in terms of physical endurance. If you’ve already establish a strong yoga practice, snowboarding will become so much easier to maneuver down the line. Especially after a long day on the slopes!
And if you’re a seasoned boarder (or skier—won’t leave you guys out) looking for a new challenge, then you’re in luck. Below, I share with you a snowboarding-inspired yoga routine for building strength, stability, and increased flexibility that are sure to prepare you ahead of time for the upcoming ski season.
(Side Note: If you’ve never done yoga before, it’s highly advisable to consult your doctor before attempting this regimen.)
MOUNTAIN POSE
(TADASANA)
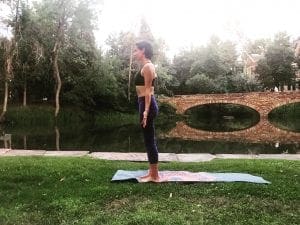
This is usually considered the starting position for all standing poses. Maintaining good posture is key when it comes to partaking in winter sports—especially snowboarding—so it’s best to practice as much as you can, both on and off the mat. It can be practiced anywhere, from sitting to walking. Not only does Mountain Pose improve balance, it also helps stimulate the nervous system.
Begin by standing at the top of your mat. Keep your feet parallel to one another and at hip distance apart (micro-bend in the knees). Toes and knees will be pointing directly forward. As you do this, see if you can relax your shoulders (drawing the blades down the back) while simultaneously engaging the abdomen and tucking the tailbone. Keep your neck and spine elongated as you do this, with eyes fixed on one focal point out in front of you. Your hands can be down at either side of your body (but keep them active; fingers spread wide), or in prayer against the sternum. Practice this pose as long as you wish. The longer good posture is maintained, the better you will be at balancing on your snowboard, thereby decreasing your chances for falling.
CHAIR POSE
(UTKATASANA)
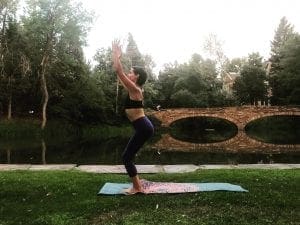
Snowboarding requires keeping the knees bent in order to successfully steer the board from heel to toe. Plus, by being closer to the ground, you’ll feel more comfortable when it comes to falling. Chair Pose is the perfect translation for this process—appropriately named. Starting from Mountain Pose (if you so desire), bring the feet to touch (big toes pressed together), and reach your arms above your head (keeping the shoulder blades drawn down the back). Now, begin to bend the knees and lower your hips as if sitting back to take a seat, shifting your weight into the heels. Draw the lower belly up as you lift your chest. Hold your posture here for a few breaths, lengthening both inhalations and exhalations (at least three counts each). This pose will help establish your center of gravity once strapped to a board. In addition, Mountain Pose is great for toning the thighs and quadriceps as well as promoting proper alignment to protect the knees.
PLANK POSE
(KUMBHAKASANA)
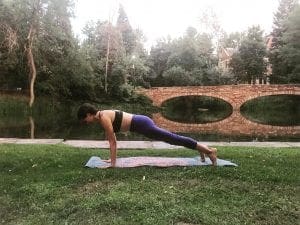
This posture is crucial. It is the glue that holds all aspects of snowboarding together, by means of an engaged core. Personally, this is my favorite pose. It’s perfect for building strength in the abdominal muscles—absolutely necessary for board balance—and increasing both physical and mental endurance. In addition to Mountain Pose, Plank promotes good posture, working not just the core, but also the limbs, shoulders, and neck (essentially, all other parts of the body in unison).
From Chair Pose, bend forward to plant your palms to the mat with spread fingers (shoulder distance apart), and step your feet back. As you hold this posture, tuck the navel up and in and elongate the spine all the way through the neck so that the crown of your head is facing forward (you’ll be looking down at your mat). Make sure to plant your feet so that you’re on the balls of the toes, spreading them if you can. Keep a micro-bend in the elbows, and remember to breathe. Hold Plank for as long as you like, taking breaks whenever you need. The more this pose is consistently woven into your yoga practice, the easier it becomes overtime—I promise! In the long run, it will make shredding down slopes an absolute breeze.
DOWNWARD DOG
(ADHO MUKHA SVANASANA)
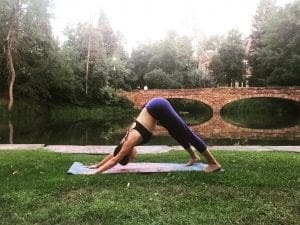
I consider this a resting posture. Sounds counterintuitive, I know, but if you’ve already built up a steady practice, this is one of the best poses to hold for a much-needed break. For those of you new to yoga but are already seasoned snowboarders, feel free to transition from Downward Dog (pictured) to Child’s Pose (not pictured), switching between postures a couple times. If we follow the transition from Plank, bend the knees and press back into Downward Dog, tilting the pelvis forward. Gently allow the head to hang and peddle out the feet, maybe lifting one leg to the sky, then the other. Play around with straightening the legs, keeping a micro-bend in the knees. When it comes to snowboarding, flexibility complements strength. This pose is great for lengthening the hamstrings, increasing mobility in the legs when you’re driving the board back and forth from heel to toe.
CRESCENT LUNGE
(ANJANEYASANA)
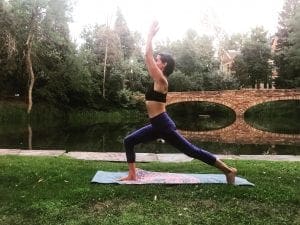
From Downward Dog, lift your right leg to the sky; briefly bend the knee, and open the hip. Next, bring the right foot through between both hands to the top of your mat. Roll onto the balls of the toes on your back foot, internally rotating the left thigh (giving it buoyancy). Utilizing the core strength in your upper body, engage your abdomen to lift your chest and raise your hands above the head. As always, keep a micro-bend in the back knee. Make sure that your right knee is aligned directly above your heel, creating a ninety-degree angle from leg to thigh. This will help prevent knee injuries. Crescent Lunge is a pose that requires physical strength and mental focus for balancing. It also strengthens the arches of the feet—wearing snowboarding boots all day will, in turn, feel a whole lot better!
WARRIOR II
(VIRABHADRASANA II)
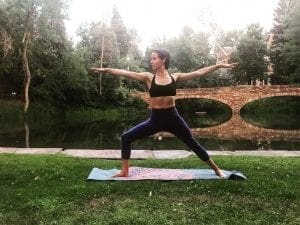
Transition from Crescent Lunge to Warrior II by planting your back foot (left foot) at a forty-five degree angle. With toes turned inward, make sure the arch of the left foot is directly in line with the heel of the right (heel-to-arch alignment). Extend your arms outward on either side as you externally rotate the inner thigh of the right leg, keeping the torso vertical and elongated. Like Crescent, this pose also builds up the arches of the feet (and heels). As an expansive pose, it allows room for deep breathing–opening up both the hips and the chest. Depending on which way you ride, your bindings should be positioned to where your lead foot is facing slightly outward. Warrior II essentially preps you for this, as you’ll be in this foot alignment for the entirety of your day on the mountain.
Personally, I feel much safer with my feet locked into place on a snowboard. If I do fall, I can feel comfortable knowing my legs won’t be twisted in different directions in the end (sorry skiers). Considering that Warrior II feels empowering when practiced, I feel even more powerful when flying down a snowy mountain—almost like a superhero!
After holding for a few breaths, windmill the arms downward from Warrior II and step back to Downward Dog. Practice the same routine (from Crescent to Warrior II) on the opposite side (left). Once finished, complete your practice with a final resting posture of your choice. You’ve earned it!


